

Saturday, August 31, 2013
Friday, August 30, 2013
Sewing Room Reveal
I have been busy turning a formal dining room into a sewing room over the past month. I received a small bonus at work and was able to put that money to good use to help with the transformation. Last weekend was the big push to get it functional, but not complete.
My formal dining room was the one room in the house that was NEVER used. With two introverts married to each other, hosting dinner parties was never on our to do list. With two toddlers in the house, getting home from work, eating dinner and getting kids to bed is about all I can accomplish most nights. Most of my sewing is done on the weekends and late at night if I'm in crunch mode.
Without further adieu, here is my space. I promise that it's very rarely this clean.


I like to sew sitting on this stool. It's got wheels and a padded cushion. It also gives me a bit more freedom than a regular chair.

The side of my sewing machine houses my iPad and a mug full of things I need within reach (small scissors, fabric marker, my Kwik Klip, magnetic wand, etc.). My iPad is usually on Netflix or Pandora while I'm sewing. I'm currently working my way through the entire series of The Wonder Years.

My project baskets. I keep everything I need for one quilt in a basket and it's always at hand right next to the sewing machine. This helps keep me organized.

These prints were a splurge and I love them! I found them at the Keep Calm Shop on Etsy. I'm a bit infatuated with all things British and they were perfect for this space.

There's my fabric storage (aka formal china hutch) against the far wall. I love that I can see my fabric through the glass of the hutch. It looks so much better than fine china! :)

Here's my work table (aka formal dining table). This is where I do all my cutting and hand work. I've got my rotary templates there and a utensil carrier holding my scissors, rotary cutters, basting pins, wonder clips and painter's tape. My roll of batting is also in the corner and ready when I need it.

These plastic drawers hold my scraps. I had this handy storage unit in the back of my closet holding useless stuff, so I rearranged a few things and now it lives here and is perfect for storing all my scraps. Prints in the top drawer, solids in the middle, and 2 1/2 in squares in the bottom. I hope to start cutting more of those squares soon so that the top drawer isn't as full.
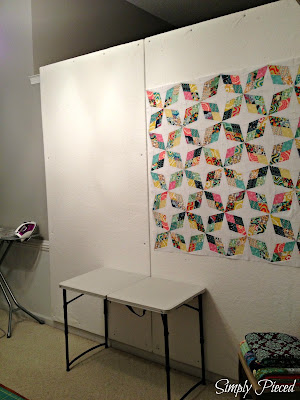
Here's my new design wall! I got this up and on the wall this past weekend. I have this weird layout with 3/4 walls dividing this space from the living room. I was able to use some 1x2 boards to attach to the back of the insulated foam boards to hang from the top molding of the wall. It's secured in place with Velcro at the top and is pretty sturdy. Considering one of those foam boards weighs about 2 lbs, I'm not too worried about it coming down. I'm pretty happy with the results and this definitely beats a hanging plastic table cloth any day.

Here's my ironing board. It's up 24/7 and ready to be used at any moment.
 The table in front of the design wall is a fold-up table that I can use when I'm quilting a quilt to help hold all the weight of the fabrics while I'm pushing it through the sewing machine. It also works as a nice table if my kids want to come color or work on a puzzle while I'm sewing on the weekend. It keeps mommy more accessible and the kids happier.

This is my grandmother's old sewing chair. I'm going to paint it and recover the seat at some point. I just haven't decided on the paint color or fabric choice.
Sewing room pros:
Well, what do you think? Would this sewing room work for you?
My formal dining room was the one room in the house that was NEVER used. With two introverts married to each other, hosting dinner parties was never on our to do list. With two toddlers in the house, getting home from work, eating dinner and getting kids to bed is about all I can accomplish most nights. Most of my sewing is done on the weekends and late at night if I'm in crunch mode.
Without further adieu, here is my space. I promise that it's very rarely this clean.


I like to sew sitting on this stool. It's got wheels and a padded cushion. It also gives me a bit more freedom than a regular chair.

The side of my sewing machine houses my iPad and a mug full of things I need within reach (small scissors, fabric marker, my Kwik Klip, magnetic wand, etc.). My iPad is usually on Netflix or Pandora while I'm sewing. I'm currently working my way through the entire series of The Wonder Years.

My project baskets. I keep everything I need for one quilt in a basket and it's always at hand right next to the sewing machine. This helps keep me organized.

These prints were a splurge and I love them! I found them at the Keep Calm Shop on Etsy. I'm a bit infatuated with all things British and they were perfect for this space.

There's my fabric storage (aka formal china hutch) against the far wall. I love that I can see my fabric through the glass of the hutch. It looks so much better than fine china! :)

Here's my work table (aka formal dining table). This is where I do all my cutting and hand work. I've got my rotary templates there and a utensil carrier holding my scissors, rotary cutters, basting pins, wonder clips and painter's tape. My roll of batting is also in the corner and ready when I need it.

These plastic drawers hold my scraps. I had this handy storage unit in the back of my closet holding useless stuff, so I rearranged a few things and now it lives here and is perfect for storing all my scraps. Prints in the top drawer, solids in the middle, and 2 1/2 in squares in the bottom. I hope to start cutting more of those squares soon so that the top drawer isn't as full.

Here's my new design wall! I got this up and on the wall this past weekend. I have this weird layout with 3/4 walls dividing this space from the living room. I was able to use some 1x2 boards to attach to the back of the insulated foam boards to hang from the top molding of the wall. It's secured in place with Velcro at the top and is pretty sturdy. Considering one of those foam boards weighs about 2 lbs, I'm not too worried about it coming down. I'm pretty happy with the results and this definitely beats a hanging plastic table cloth any day.

Here's my ironing board. It's up 24/7 and ready to be used at any moment.


This is my grandmother's old sewing chair. I'm going to paint it and recover the seat at some point. I just haven't decided on the paint color or fabric choice.
Sewing room pros:
- I have lots of room to move around and plenty of storage space to meet my needs.
- I have a large design wall and I can't wait to put it to good use.
- I have a place where my children can come and join me while I'm sewing without getting in the way.
- I have no natural light. All the windows are in the living room/kitchen or by the front door.
- My walls are bare.
- Lots of dark woods. I like dark woods, but prefer lighter tones in a creative space, especially since I have no natural light. One day I may attempt to fix this, but it will just have to do for now.
- Quilted wall hangings to brighten up the space.
- A quilt rack my father is building for me to display WIPs and finished quilts.
- A small bookcase to hold sewing/quilting books.
Well, what do you think? Would this sewing room work for you?
Thursday, August 29, 2013
Aviary Triangles
I've been admiring several quilters' triangle quilts and I knew I just had to try it out for myself. A friend from work informed me that she was expecting in early fall and I couldn't wait to make her baby a triangle quilt. Once I knew she was having a girl, I searched and search for something that would work for a baby quilt. The mom's favorite color is purple and the baby's nursery walls are a sage green. She is also very drawn to earthy and natural things and I wanted to try and fit this all together in a quilt. When I found Joel Dewberry's Aviary Lilac collection, I was sold.


I'll be honest in saying that I was a bit hesitant about making a purple quilt. I love purple, but I haven't been too crazy about the purple quilts I've seen. I feel a lot of pride in this finish and I love how this purple quilt turned out.
I cut out my pieces and headed over to Kelly's house from My Quilt Infatuation to piece them together. Our kids played and we sat behind our sewing machines sewing away. I'm so thankful for her son's patience with my two little ones. He did a great job entertaining them.
I left Kelly's house with a finished top. I basted and quilted the quilt the very next day and finished the binding by bed time. It was nice to be finished with a quilt in such a short time, but that's how it goes with a small baby quilt. I'm pleased with the results and the fact that I didn't chop off the points of my triangles, which was a legitimate fear.


I'll be honest in saying that I was a bit hesitant about making a purple quilt. I love purple, but I haven't been too crazy about the purple quilts I've seen. I feel a lot of pride in this finish and I love how this purple quilt turned out.
Wednesday, August 28, 2013
Sewing Machine Cover
In the midst of a project that was driving me a bit crazy, I decided to spend an evening working on something else to give me a bit of a break. I have been toying with the idea of making my own sewing machine cover and started looking at google images for ideas. Low and behold I found this tutorial that made me smile. Jennifer Mathis at Ellison Lane did a spectacular job on hers and used her tutorial as a guide. Here is her lovely creation.

Since I have 2 very curious children and I don't want them to have access to even the sides of my machine, I knew I needed to enclose the sides of mine. The ribbons on the sides of Jennifer's just wasn't going to work as well for me. I pulled out some scrap fabric and got to work. This is what I came up with. (Sorry for not including pictures of the creative process)


Since I have 2 very curious children and I don't want them to have access to even the sides of my machine, I knew I needed to enclose the sides of mine. The ribbons on the sides of Jennifer's just wasn't going to work as well for me. I pulled out some scrap fabric and got to work. This is what I came up with. (Sorry for not including pictures of the creative process)


I'm really pleased with how it turned out. Of course, this cover won't work if my machine is out of the cabinet. I wasn't thinking clearly and only measured from the table top of the cabinet to the top of my machine. I completely ignored the 3+ inches of the sewing machine that exists below the table top. Oh well...
Now that this distraction is complete, I can return to my original project with a much clearer frame of mind.
Wednesday, August 21, 2013
Arkansas Traveler Top Complete
I have finished the Arkansas Traveler quilt top. Woohoo!


Here's a sneak peak at what is already on my design wall for my next project.


Here's a sneak peak at what is already on my design wall for my next project.

Saturday, August 17, 2013
Modern Herringbone
Earlier this year, I made a quilt (Girly Charm) using fabrics from Anna Marie Horner's Field Study, Tula Pink's Birds and Bees,
Denyse Schmidt's Chicopee and Ty Pennington's Impressions Spring 2012 charm packs. What fabrics did not get used in the earlier mentioned quilt are now being put to good use in this one.
As with the Plus Quilt, this mom also received one of my first quilts back in 2011. She has a modern sense of style and I knew she would appreciate modern prints in a modern pattern.
For this quilt, I took each charm pack square and layered it with a white square of the same size. Then I sewed a quarter inch seam around the perimeter of the square. I took my rotary cutter and cut the diagonals of the square and ended up with 4 half-square triangles. I then took 2 of the half-square triangles sewing them together to form the herringbone in one direction. I then sewed together the other 2 half-square triangles in the other direction. With lots of repetition and piecing and pinning, I had this beautiful top piece that just popped! I still can't get over the effect it has on me every time I open the quilt to look at it.


For the back, I ended up using Riley Blake's Zoofari Animal Words as the main fabric. I liked the idea of the animal words instead of animal pictures...it seemed more modern. I added the wide strip of white to help break it up. The orange binding matches one of the herringbone pieces in the top.


Plus One
I have reached a point in my quilting journey where friends who have previously received a baby quilt have now gotten pregnant again and are receiving another one. Time has flown by and I've learned so much since those early quilting days.
This soon-to-be-born baby boy has quite the parentage. The mom is an AP calculus teacher who is staying home for a time to raise her family. The dad is a chemist with a PhD. We can only assume their children will find careers as rocket scientists, research doctors who find the cure for cancer, or environmental scientists who figure out how to reverse global warming. There's no pressure...we don't want to set the expectations TOO high. :-) And to help this child along, I thought a plus quilt to ignite the infantile mathematical brain waves to start computing was only appropriate.
The plus quilt is fairly easy to piece together as long as you make sure to keep everything in order on your design wall and use liberal pinning to match your seams all the way through. I chose bright colors to make this quilt pop. I was really pleased with how this quilt turned out.


The back is a combination of a grey and white diamond pattern and scraps from the fabrics used in the top. I used echo quilting to follow the seams on the top and diagonal lines to add a bit more interest to the pattern. The binding is a chevron print that brings in all the colors of the quilt and truly ties is all together.


Do you think this baby has a chance at becoming a genius? I do!
Wednesday, August 14, 2013
Paper-Piecing Update
I've been steadily working towards a finished top. Just one more row of blocks to go.


Tuesday, August 13, 2013
China...What China?
Sarah @ Sarah Quilts is hosting a link party to show off our fabric stashes and I'm sneaking in before the deadline. Here is my lovely China cabinet filled with beautiful China place-settings fabric! We use to display our China, but found it a bit impractical since this room also acts as my sewing room 364 days out of the year. I would rather be looking at all the great fabrics I have instead of dishes we've used 3 times in our 8 years of marriage. (I wish someone would have truly taken the time to tell me the realities of China when I was engaged and registering...oh, well.)

On the right side of the cabinet, I have all the fabric collections and precuts that will someday turn into quilts. I also store the rotary templates here as well.

The left side has all my individual fabrics sorted by colors. To say that my husband does not understand my infatuation with fabric is an understatement. :)

Here is my scrap box that has been faithfully collecting fabric for 3 years that will one day be turned into a fun scrappy quilt. I'm to a point where I'm going to start sorting through this box and cutting 2 1/2 inch squares to start my scrappy quilt pieces. Based on the design I have in mind, I need 936 squares, so I might as well get the ball rolling.

Here is my fabric stash. You still have time to share your stashes and link up!
Sunday, August 11, 2013
Girly Dresden
The Dresden pattern has always caught my eye, except I felt like it was a bit dated. I wanted to take this pattern and give it a modern twist. I have a few other ideas for this pattern, but let's just take one step at a time.
For this quilt I pieced the Dresden pieces together using patterned scraps in my stash and clustered them in the opposite corners. Most of these scrap pieces come from the very first quilt I ever made. I cut hexagons out of coordinating-solid fabrics to cover up the centers of the Dresden pieces. The background fabric for the top is a white on white chevron print that's hard to see in the pictures.


The back is a solid grey fabric. I wanted to bring in a touch of color throughout the quilt, so I used a multicolor pastel thread for the quilting. The binding is a wavy yellow print. I put a lowercase initial on the back for the baby.


This is a pretty simple quilt to put together, but the colorful Dresdens really give this quilt a fun personality.
Subscribe to:
Posts (Atom)